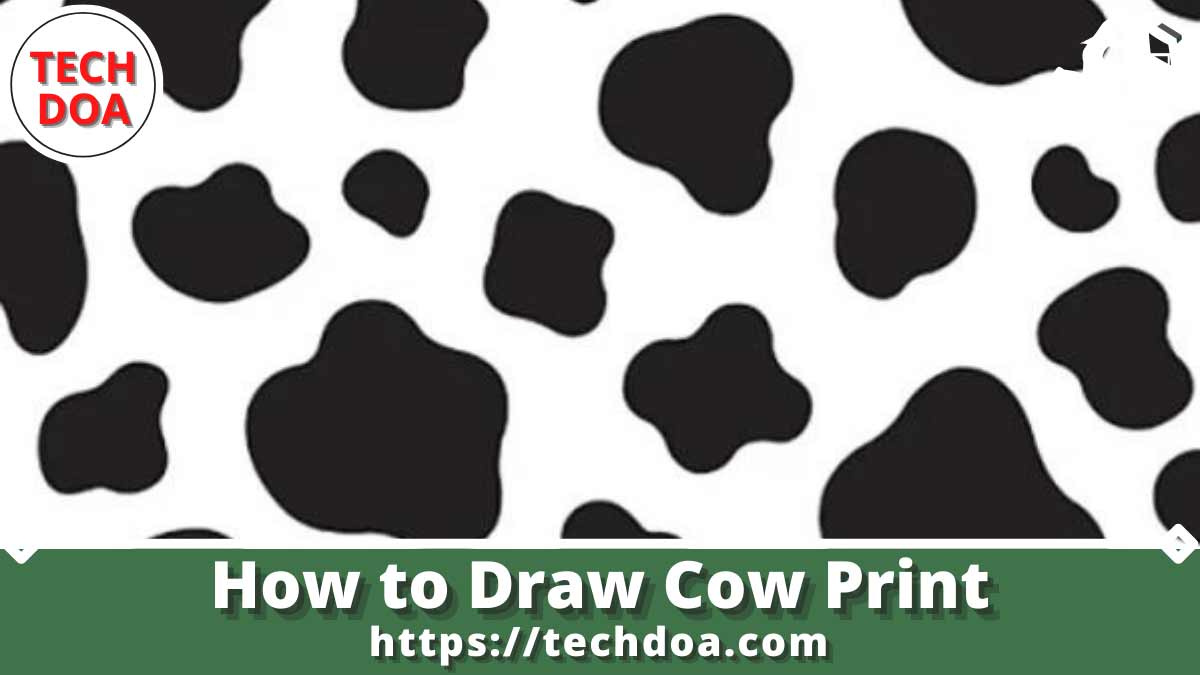
To draw cow print, start with a black base coat and add white irregularly shaped spots. Then, use a fine-tipped brush to outline the spots with black.
Cow print is a classic design that never goes out of style. It’s a fun and playful pattern that is perfect for everything from clothing to home decor. Drawing cow print may seem challenging, but with a few simple steps, you can create a realistic and eye-catching print.
In this article, we’ll break down how to draw cow print in a way that’s easy to follow and understand. We’ll also provide tips on how to use cow print in your designs and where to find inspiration for this timeless pattern. So, grab your art supplies and let’s get started!
Credit: www.makeup.com
Materials Required
Cow print has been trending in the fashion industry lately. Adding cow print to clothes and accessories has become a popular way to make them eye-catchy. If you are also a cow print lover, then you should know how to draw it by yourself.
In this section of the blog, we will discuss the materials required for drawing cow print.
List Of Materials Required To Draw Cow Print
Before starting drawing cow print, it’s essential to gather all the required materials. Here is the list of materials that you’ll need:
- Pencil (mechanical or regular)
- Eraser
- Black marker or pen
- White paper or sketchbook
- Ruler or straight edge (optional)
Explanation Of The Importance Of Each Material
Every material that we’ve mentioned in the above list is important in its way. Let’s discuss the importance of each one of them:
- Pencil: A pencil is required to sketch out the cow print before using the marker or pen. It allows you to make changes and adjust the design as needed.
- Eraser: Eraser helps to remove the unwanted lines or mistakes made while sketching. It allows you to make a clean and precise drawing.
- Black marker or pen: A black marker or pen is used to trace over the sketched design. It gives a deep and pigmented line that resembles the cow print.
- White paper or sketchbook: White paper or sketchbook is used to draw the cow print design. It gives you a blank canvas to work with and allows you to visualize the cow print.
- Ruler or straight edge (optional): If you want to make precise lines while drawing the cow print, then a ruler or straight edge can be used. It helps to make straight and accurate lines, especially while drawing the grid.
Alternatives To Some Expensive Materials
If you don’t have the above materials or don’t want to spend extra money on them, then here are some alternatives to consider:
- Instead of a mechanical pencil or regular pencil, you can use a pen or a marker for sketching.
- Instead of a black marker or pen, you can use a black gel pen or a ballpoint pen.
- If you don’t have a sketchbook, you can use any white paper you have available, such as printer paper or notebook paper.
These are the materials required to draw cow print, along with their importance and some alternatives. Gathering these materials will ensure that you have everything needed to create a beautiful cow print design.
Sketching The Outline
Creating A Rough Sketch Of The Cow Print
Sketching the outline is the first step towards drawing your very own cow print. By drawing a rough sketch, you set the foundation for your final artwork.
Here are a few key steps to keep in mind when creating a rough sketch of the cow print:
- Start with a reference image of a cow print. You can find plenty of images online or use a print fabric for reference.
- Decide on the dimensions of your artwork. Make sure you choose the right size and proportions, keeping the purpose of your artwork in mind.
- Begin sketching the outline of the cow print. Start with the spots that will serve as the focal point of your artwork.
Importance Of Getting The Dimensions Right
Getting the dimensions right is crucial when drawing a cow print. Whether you’re creating a large painting or a small sketch, the dimensions will dictate the overall look and feel of your artwork.
Here are some key points to keep in mind:
- Choose the right dimensions based on the purpose of your artwork. If you’re painting a large canvas, you’ll need to plan accordingly.
- Use a ruler or measuring tape to ensure that your dimensions are precise.
- Pay attention to the proportions of your artwork to ensure that everything looks balanced and in harmony.
Tips On How To Do It Correctly
Getting the dimensions of your cow print just right might seem like a daunting task, but it’s not impossible. With the right plan of action, you can easily achieve the desired results.
Here are some tips to help you get started:
- Use a grid system to make sure that your proportions are accurate.
- Start with a rough sketch and make changes as you go along.
- Use a reference image to ensure that your cow print looks authentic.
- Don’t be afraid to experiment with different sizes and dimensions.
By following these tips, you can create a beautiful cow print that will impress all of your friends and family. Remember to keep practicing and experimenting with different techniques to hone your skills.
Adding The Spots
Now that you’ve got the base coat completed on your cow print, it’s time to add the spots. This is where your cow drawing really comes to life! It’s important to get the size and placement of your spots right, as it can make a significant difference in the overall appearance of your drawing.
In this section, we’ll provide you with the step-by-step guide to drawing the cow spots.
Tools Required To Create The Spots
Before we jump into the step-by-step guide, it’s important to have the right tools to create your cow spots. Here’s what you need:
- Black marker or pen
- Pencil
- Ruler
- Eraser
Step-By-Step Guide To Drawing The Spots
Follow these easy steps to get those perfect cow spots:
- Using your ruler and pencil, sketch out the rough size and shape of the spots. Keep in mind that they should be various shapes and sizes.
- Once you’re happy with the placement of the spots, draw the black outlines with your marker or pen.
- Add smaller spots throughout the cow print to make it look realistic. You want your spots to be random and not too uniform.
- Lastly, add some shading around your spots to give them some depth and dimension.
Importance Of Getting The Size And Placement Right
It’s crucial to get the size and placement of the spots right as it can affect the overall appearance of your cow print. If the spots are too big or too small, or if they’re not placed correctly, they can make your cow print look unbalanced and unrealistic.
To avoid this, take some time to plan out the size and placement of your spots before drawing them in. Use a ruler to ensure your spots are uniform in size and shape, but don’t be afraid to add some irregularities to make it look more natural.
Adding the spots to your cow print is one of the most crucial steps to creating a realistic drawing. By following the step-by-step guide and ensuring the size and placement of your spots are accurate, you’ll have an impressive cow print that will be sure to impress.
Coloring The Cow Print
Cow prints are a fun and classic pattern that can add a unique touch to any design project. Once you have drawn the outline of your print, it’s time to add some color! In this section, we will guide you through the process of coloring the cow print step-by-step.
Types Of Colors To Use
Before we start, let’s talk about the types of colors you should use for the cow print. You have a few options:
- Black and white: This is the classic cow print color scheme, and it looks great on its own or combined with pops of color.
- Brown and white: If you want a more realistic cow print, try using brown instead of black. This will give your print a softer, more natural look.
- Bright colors: For a more playful take on the cow print, try using bright colors like pink or blue. This is a fun way to add some personality to your design.
Step-By-Step Guide To Coloring The Print
Now that you’ve chosen your colors, it’s time to start coloring! Follow these steps to create a beautiful cow print.
- Start by filling in the larger sections of the print with your base color. For example, if you’re using black and white, fill in all the white sections first.
- Use a smaller brush or pen to fill in the smaller areas of the print. Take your time and be precise – this will give your print a clean, polished look.
- Once you’ve filled in all the sections with your base color, it’s time to add some shading. Use a slightly darker shade of your base color to add shadows to the print. For example, if you’re using black and white, use a light grey to add shadows to the white areas.
- Next, it’s time to add highlights. Use a slightly lighter shade of your base color to add highlights to the print. For example, if you’re using black and white, use a light grey to add highlights to the black areas. This will give your print some depth and dimension.
- Finally, use a blending tool or your fingertip to blend the shading and highlights into the base color. This will create a smooth, gradient effect.
Tips On Shading And Highlighting
Shading and highlighting can be tricky, but with a little practice, you’ll be able to create beautiful, realistic prints. Here are a few tips to help you get started:
- Use a reference image: If you’re having trouble visualizing where the shadows and highlights should go, try using a reference image of a real cow.
- Start light: It’s easier to add more shading and highlights later than it is to remove them if you’ve gone too dark.
- Be subtle: You don’t need to go overboard with the shading and highlights – a little goes a long way.
- Practice: The more you practice, the more comfortable you’ll become with shading and highlighting. So grab a sketchbook and start practicing!
Now that you know how to color a cow print, let your creativity run wild! Whether you’re using the classic black and white color scheme or trying something new, a cow print is a fun and versatile pattern that will add some flair to any project.
Finishing Touches
Cow print is a fun and unique pattern that is perfect for adding some excitement to any piece of clothing or accessory. After following the previous steps on how to draw cow print, you may find that something is missing to make it look truly realistic.
In this section, we will discuss the additional touches you can add to make your cow print design stand out.
Additional Touches To Make The Print Look More Realistic
To make your cow print look more authentic, try adding some of these finishing touches:
- Shade the spots: Instead of filling in each cow spot with solid black, try shading each spot, adding depth and texture to your design.
- Vary the spot size: Don’t feel like you need to create every spot the same size. In nature, cows have varying spots, so try mixing it up with a range of small and large spots.
- Connect spots: Cow spots are not random; they typically connect in a specific pattern. Look for inspiration from reference photos to mimic the natural patterns found on real cows.
- Smudge the edges: To create a softer, more natural look, try smudging the edges of your spots to blend them seamlessly into the white areas.
Importance Of Adding Small Details
Adding extra details to your cow print increases the likelihood of making it look more realistic. By incorporating realistic touches, such as shading or pattern variation, you enhance the overall quality of the design.
Additionally, as a content writer, you may think small details are not important; however, in the broader seo context, it is to consider the readers’ expectations and ensure that the content fulfils the ‘eat’ (expertise, authority, and trustworthiness) criterion.
Final Thoughts And Tips
Drawing cow print is a fun and exciting process that can be easily accomplished with the right techniques. Remember, to achieve a realistic design, include small details such as varied spot size and shading. And always keep in mind that eat is an essential factor in content writing, not only seo.
By writing unique and engaging content, you ensure that your readers keep coming back for more.
Bonus: Cow Print Drawing Video
Cow print is a fun and fashionable print that has been around for generations. It has graced all sorts of items, including clothing, accessories, and even furniture. Drawing cow print can be challenging, but it can also be a rewarding and fun experience.
Bonus, we have a cow print drawing video to help you make the process even easier. So, let’s dive into it and find out how to create cow print on various materials using various techniques.
Create Cow Print On Various Materials Using Various Techniques
Cow print can be drawn on various materials such as paper, clothing, accessories, and even walls. The right technique can depend on the material you are working with. Here are some tips to help you create cow print on different materials using different techniques:
- For paper: Start by drawing large organic shapes in black and white, using a pencil to create an outline. Next, use a black marker to refine the shapes and add details such as spots. Finally, use a white marker to add highlights to your spots.
- For clothing: Start by selecting your garment and preparing your workspace. Place a piece of cardboard inside your garment to avoid ink bleed-through. Next, use fabric paint and a small brush to create organic shapes in black and white. Use a wet brush to smudge the edges and create a softer look, and let the paint dry. Finally, use a clean brush to dry brush white paint over the black shapes to create highlights.
- For accessories: Start by selecting your accessory, such as a shoe or a purse. Next, use fabric markers to create organic shapes in black and white. Use a wet brush to smudge the edges and create a softer look. Finally, use white paint and a small brush to add highlights to your spots.
- For walls: Start by preparing your work space and ensuring that your wall is clean and dry. Next, using a pencil to create an outline, draw large organic shapes in black and white. Use a small brush and black paint to refine the shapes and add details, such as spots. Finally, use a small brush and white paint to add highlights to your spots.
Cow Print Drawing Video
Bonus, we have included a cow print drawing video to make the process even easier for you. Our expert artist takes you through the process step-by-step, showing you how to create organic shapes and adding details to create a fun and stylish cow print.
Creating cow print can be challenging, but with the right technique, it can also be a rewarding experience. We hope these tips and the cow print drawing video help you create beautiful cow print on various materials and add a touch of fun and fashion to your life.
Happy drawing!
Frequently Asked Questions For How To Draw Cow Print
Can You Draw Cow Print Without Stencils?
Yes, with a little practice, you can. Start by drawing parallel lines. Then, draw the spots along those lines in contrasting colors.
What Supplies Do You Need To Draw Cow Print?
You’ll need black and white paint, a flat brush, and an object to paint on.
What Is The Easiest Way To Draw Cow Print?
Try using a stencil. Cut out cow spots in cardboard, place it on your object, and paint over it.
How Do You Make Cow Print Look Realistic?
Use varying shapes and sizes for the spots. Keep the spacing irregular; cows have no rhyme or reason to their pattern.
Can You Use Cow Print In Home Decor?
Absolutely! Cow print accents can liven up any living space. Pillows, curtains, or even wallpaper are all great options.
Conclusion
Drawing cow print can seem intimidating, but with the right techniques and practice, it can become an enjoyable artistic experience. Remember to start with the basic shapes and gradually add details. Be patient, take your time, and don’t be afraid to make mistakes.
The more you practice, the more confident you will become in your abilities. By following the steps and tips provided in this guide, you can create a realistic and dynamic cow print that can be applied to a variety of projects.
Whether you are looking to decorate your room or design a unique piece of clothing, drawing cow print can add a touch of creativity and whimsy to your work. So, have fun and let your imagination run wild!

Founder, CEO and author of Techdoa.com. With a great experience after using multiple printers, I review best printers with proper guideline. I hope my provided information will inspire you to choose the best printer for your personal or professional work.