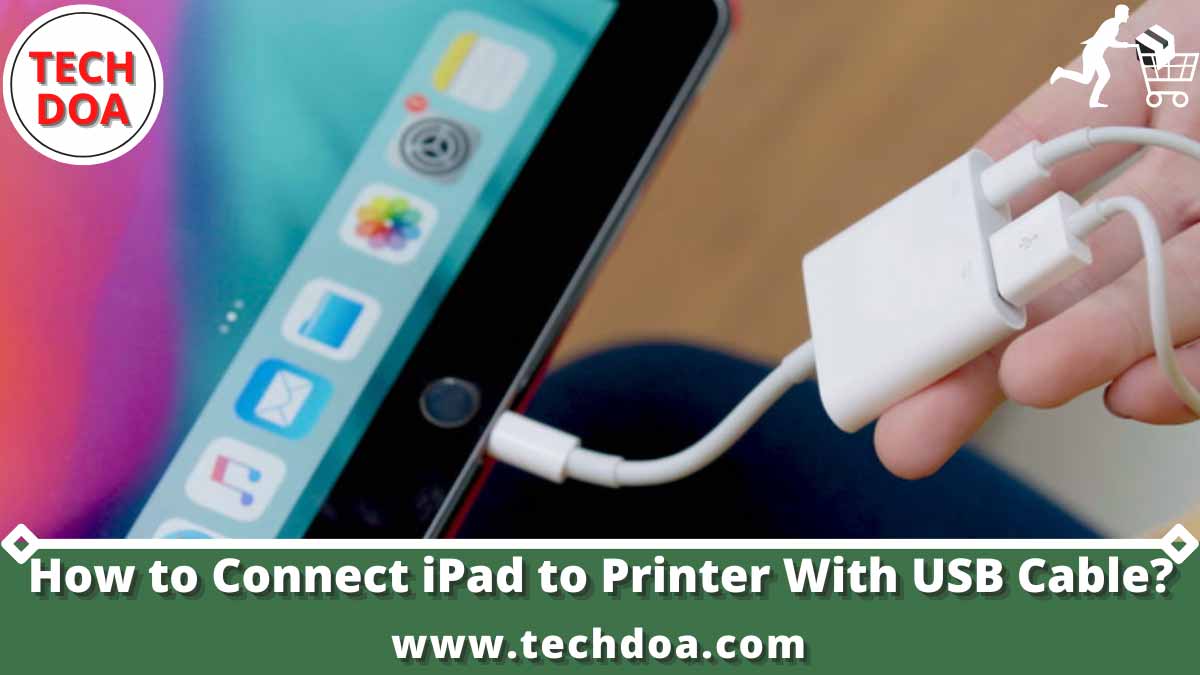
The iPad is a great device for many things, but one area where it falls short is printing. Luckily, there is a way to connect iPad to printer with usb cable. If you have an iPad and a printer with a USB port, you can connect the two devices using a USB cable. This will allow you to print documents and photos from your iPad. Here’s how to do it: First, make sure that your printer is turned on and connected to your computer.
Then, take the USB cable and plug one end into the port on the back of your printer. The other end of the cable should go into the Lightning connector on your iPad. Once the connection is made, open the app that you want to print from (such as Safari or Photos). Find the document or photo that you want to print, tap the Share icon, and select Print. Your printer should start printing!
Can I Connect iPad to Printer With USB Cable?
Yes, you can connect your iPad to a printer with a USB cable. However, doing so requires a few more steps than simply connecting the two devices. First, you’ll need to download and install a printing app on your iPad. Once that’s done, open the app and follow the instructions for connecting to a printer. When prompted, select the USB option and then choose your printer from the list of available devices. Finally, print your document or file using the app.
Can I Plug My iPad into My Printer to Print?
Yes, you can print from your iPad using an Air Print-enabled printer. Air Print is a wireless technology that allows you to print from your iPad without having to install any drivers or software. To use Air Print, simply connect your iPad and printer to the same Wi-Fi network and then select the print option in the app that you’re using.
How Do I Manually Connect My iPad to My Printer?
Assuming you would like a step-by-step guide on how to connect your iPad to a printer:
- Locate the Settings app on your iPad and open it.
- Tap “Wi-Fi” in the left column; if Wi-Fi is off, tap the switch to turn it on.
- Wait for your Wi-Fi network to appear in the list of available networks, then select it.
- Open the app that you want to print from (such as Safari or Notes).
- Tap the Share icon (which looks like a box with an arrow pointing up) within the app.
- Select “Print” from the Share menu that appears; if you don’t see “Print,” tap More first and enable the Print option by tapping next to it, then select Print from the expanded Share menu that appears afterward.
- Choose an AirPrint printer from the Printer Options list that appears; if there’s no AirPrint printer nearby, you can install a printing app such as HP Smart or PrintCentral Pro instead (see Resources for links).
- If prompted, choose specific pages or documents to print rather than selecting All Pages or All Documents; otherwise, skip ahead to Step 9 below.. After making your selection(s), tap Print in the upper-right corner of the screen.
- If using an AirPrint printer: The printing process will now begin automatically and wirelessly. When finished printing, close any open apps and return to your home screen by pressing the Home button at the bottom of your iPad’s display.
- If using a non-AirPrint printer: Follow any instructions that appear onscreen after tapping Print in Step 8 above.. When asked where you’d like to send your document(s), choose Save PDF to iBooks instead of Email PDF or Open In Another App; this will save copies of them locally on your iPad for future reference even when you’re not connected wirelessly to a printer.
How Do I Connect My iPad to My Printer Without Air print?
If you’re using an iPad without AirPrint capabilities, there are a few different ways that you can connect your device to a printer. One option is to use the iPad’s built-in Bluetooth functionality to connect wirelessly to a compatible printer. Another option is to use Apple’s Lightning to USB Camera Adapter and connect your iPad directly to a printer via USB.
If you’re looking for a wireless printing solution, Bluetooth is the way to go. To get started, make sure that your iPad and printer are both turned on and within range of each other. Then, open the Settings app on your iPad and tap “Bluetooth.” You should see your printer listed under “Other Devices.” Tap on the printer name to initiate pairing.
Once the pairing process is complete, you should be able to print from any app that supports printing on your iPad. To use a wired connection, start by plugging the Lightning end of the adapter into your iPad. Then, connect the other end of the adapter into one of the USB ports on your printer.
Once everything is plugged in, open the app that you want to print from and look for the “Print” option in the Share menu. Selecting this option should bring up a list of available printers; select yours from this list and hit “Print” once again. Your document should start printing immediately!
How to Connect iPad to Non Wireless Printer
Assuming you would like a blog post discussing how to connect an iPad to a printer that is not wireless: “How to Connect iPad to Non Wireless Printer” Most people are familiar with the fact that iPads can connect wirelessly to printers. However, did you know that you can also connect your iPad to a printer that is not wireless?
Here’s how: First, make sure that your iPad and printer are both turned on and connected to the same network. Then, open the Settings app on your iPad and tap “Wi-Fi.” Next, tap the name of your network in the list of available networks. Once you’re connected to your network, open the app that you want to print from. For example, if you’re trying to print a document from the Pages app, tap the “Share” icon in the top-right corner of the screen.
Can I Connect My iPad Directly to a Printer
It’s no secret that Apple’s iPad is one of the hottest devices on the market. Its sleek design, powerful features, and intuitive interface have made it a favorite among consumers and businesses alike. One of the most popular uses for the iPad is as a portable document viewer and editor. But what happens when you need to print those documents? Can you connect your iPad directly to a printer? The answer is yes… sort of.
While there are some wireless printers that are compatible with the iPad, most traditional printers are not. However, there is a workaround. By using a computer with a printer attached, you can “share” that printer with your iPad via a process called “print sharing.” Here’s how it works:
- Make sure both your computer and your iPad are connected to the same Wi-Fi network.
- On your computer, open System Preferences and click on “Sharing.”
- Select the checkbox next to “Printer Sharing.” A list of available printers will appear below; select the one you want to share and click “OK.”
- On your iPad, open up Safari and navigate to any page that you want to print (for example, http://www.apple.com).
- Tap the Share icon in the toolbar (it looks like a box with an arrow coming out of it). 6) Tap on “Print” in the Share menu.
Air Print to USB Printer
Airprint to USB Printer As we all know, many newer printers have the ability to connect to a wireless network. This means that you can print from any device that is connected to your network without having to physically connect the printer to the computer. However, what if your printer does not have this capability?
Or maybe you want to be able to print from your phone or tablet without having to go through your computer. In either case, you can use a technology called AirPrint. AirPrint is Apple’s solution for printing wirelessly from iOS devices. It uses the Bonjour protocol to discover and connect to compatible printers on a local network.
Once it has found a compatible printer, it will automatically configure the settings and begin printing. AirPrint is built into iOS so there is no need for any extra software or drivers on your device or on the printer itself. One thing to keep in mind is that AirPrint only works with certain types of printers.
These include most HP ePrint-enabled printers, some Canon and Epson models, and select Brother, Lexmark, and Samsung printers. You can check the list of supported printers on Apple’s website (https://support.apple.com/en-us/HT201465). If your printer is not listed there, then it unfortunately will not work with AirPrint.
Another thing to note is that even if your printer is listed as being compatible with AirPrint, it may not work with all features of iOS such as Mail or Safari printing. So how do you actually use AirPrint? The first step is making sure that both your iOS device and your printer are connected to the same Wi-Fi network.
Once they are both connected, simply find the document or file that you want to print and open up the Share menu. From there, tap on “Printer” and choose which printer you would like to print from out of those that show up in the list (assuming more than one AirPrint-compatible printer is connected to your Wi-Fi network). Finally, just click Print and wait for your document or fileto come out of the printer!
iPad Printing to ANY USB Printer
Conclusion
If you’re looking to connect your iPad to a printer, and you don’t have a wireless network, you can do so using a USB cable. Here’s how: First, make sure that your printer is turned on and connected to your computer via USB. Then open the Settings app on your iPad and tap “Printers & Scanners.” Next, tap the “+” button in the top-right corner of the screen.
On the next screen, select the type of printer you want to add: AirPrint or another type of printer. If you’re adding an AirPrint printer, simply select it from the list and follow the on-screen instructions. Otherwise, tap “Other Printer or Scanner.” On the next screen, select “USB” from the list of options.

Senior Editor at Techdoa.com. With a great experience after using multiple printers, I review best printers with proper guideline. I hope my provided information will inspire you to choose the best printer for your personal or professional work.