When you are finished with your 3D print and ready to remove it from the build plate, there are a few things you need to do first. Depending on the type of supports used, removal can be easy or difficult. For example, if you used support material that can be dissolved in water, then all you need to do is submerge your print in the water and wait for the supports to detach.
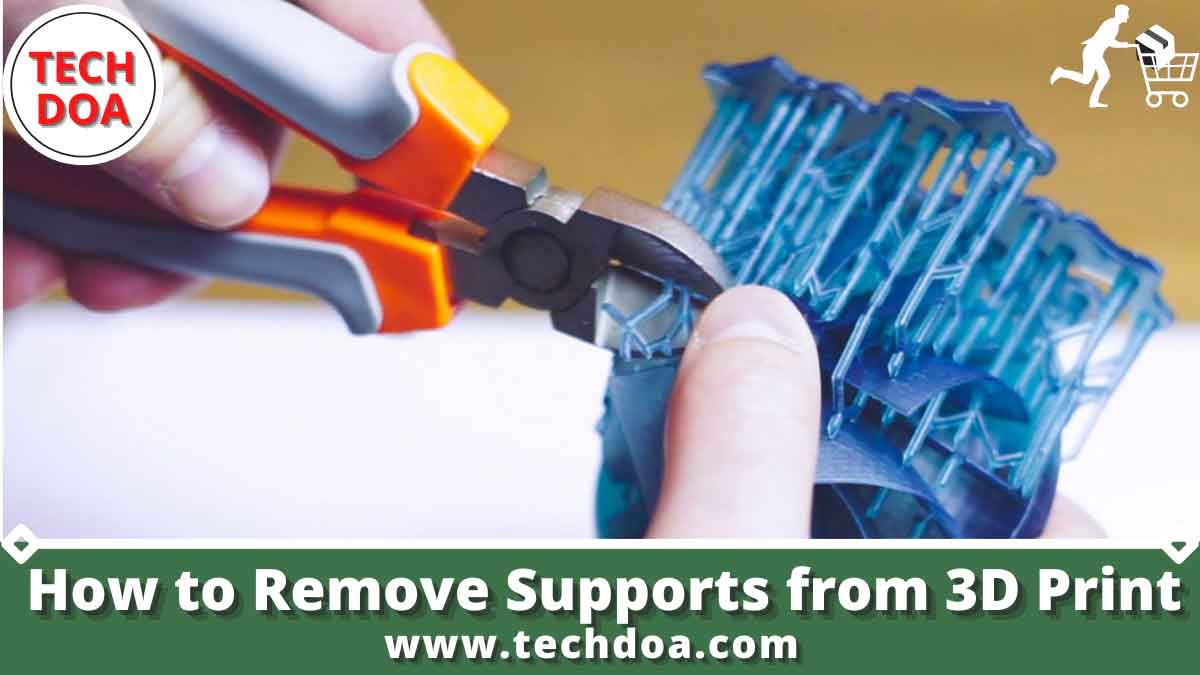
However, if you used supports that need to be cut away, then removal will take a bit more time and effort. Before beginning, it is important to have the right tools for the job. A pair of needle-nose pliers or tweezers will come in handy for removing small supports. For larger ones, you may need a razor blade or hobby knife. You will also need something to catch and contain any falling debris so it doesn’t end up making a mess on your work surface.
Once you have your tools gathered, start by gently wiggling each support free from its attachment point. If they are stubborn, use your pliers or knife to carefully cut them away. Be careful not to damage your print in the process. Once all of the supports are removed, take a look at your handiwork and admire your newly freed 3D print! If you are looking for the answer about how to remove supports from 3d print, here you will find the best guide.
- Unscrew the support from the object
- Cut away any excess support material with a sharp knife or scissors
- Use a file or sandpaper to smooth away any rough edges where the support was attached
How to Remove Supports from 3D Print?
3D supports can be easier to remove by following a few simple tips. First, use a sharp object such as an exacto knife or hobby knife to score along the edge of the support where it meets the print. This will create a weak point that will make breaking the bond between the support and the print easier. Second, use pliers or tweezers to grip the base of the support and twist or pull it away from the print. If necessary, reheat the area with a heat gun or hair dryer to soften the plastic and make removal easier. Finally, use sandpaper or a file to smooth away any rough edges left behind by the supports.
How to Remove Support from 3D Print?
How Do I Print Easy to Remove Supports?
Assuming you would like tips on how to remove supports from your 3D printed object: One way to remove supports is to use a pair of needle-nose pliers. Start by gently wiggling the support back and forth until it loosens, then continue pulling until it comes out completely. If there are any stubborn areas, try using a razor blade or exacto knife to carefully cut through the support material. Another method is to use heat to soften and melt the support material. This can be done with a hair dryer, heat gun, or even a lighter (although be careful not to overdo it and damage your print!).
Hold the heat source close to the area where the support meets the print, and wait for it to start melting before gently pulling on the support. Finally, if you’re struggling to remove supports manually, there are some great software programs that can automatically generate them for you! Check out programs like Chitubox or Netfabb Basic (both free) which will make support removal much easier.
Related Article:
- .Heat Press VS Screen Print- Which Will Be the Best?
- Best Ways To Fixed HP Printer Keeps Saying Reinstall Ink Cartridge
How Do You Remove Pla Support Material?
Assuming you are referring to support material that has been printed using PLA filament, there are a few ways to remove it. One way is to simply use your hands to break it off. PLA is a relatively brittle material, so this should be fairly easy to do. However, depending on how intricate your print is, this may not be possible or may damage the print itself. If breaking the support material off by hand is not an option, you can try using a sharp knife or pair of scissors. Be careful not to cut into the actual print though!
Another option is to use sandpaper or a file to slowly grind away at the supports until they are removed. This will take some time and effort, but should eventually get the job done. Finally, if all else fails, you can try dissolving the supports in acetone (nail polish remover). This will only work with ABS or PLA that has been treated with an acetone vapor bath though – regular PLA will not dissolve in acetone. Place your print in a container of acetone and wait for the supports to dissolve – this could take anywhere from a few hours to a day or two. Once they have dissolved completely, remove your print from the acetone and rinse it off with water.
How to Remove Supports from 3D Prints Fdm?
When you are ready to remove the supports from your 3D print, there are a few things you need to take into consideration. The first is the type of supports that were used. If water-soluble supports were used, then you can simply place the print in a container of warm water and let them dissolve away. If non-water soluble supports were used, then you will need to use a pair of needle-nosed pliers or tweezers to remove them. The second thing to consider is the material that your print is made from. Some materials are more delicate than others and can be easily damaged when removing supports.
If you are unsure about what material your print is made from, it is always best to err on the side of caution and use the needle-nosed pliers or tweezers. Once you have considered these two factors, removing the supports from your 3D print should be a relatively straightforward process. Simply start at one end and work your way around until all of the supports have been removed.
How to Remove Supports from 3D Print Pla?
When you are finished 3D printing your PLA object, the supports need to be removed. This can be done by breaking them off or by dissolving them in water. To break off the supports, simply grab them with a pair of pliers and snap them away from the object. You may need to use a little bit of force, but try not to damage the object itself. If there are any stubborn supports that won’t come off easily, you can use a hobby knife to carefully cut them away.
If you want to dissolve the supports instead, you’ll need to put your object in a container of warm water. The warmer the water, the faster the supports will dissolve. Leave your object in the water for at least an hour, or until all of the supports have melted away.
How to Remove Supports from 3D Prints Cura?
If you’re using Cura as your slicing software, there are a few different ways that you can remove supports from your 3D prints. In this blog post, we’ll go over how to do it in both the GUI and CLI versions of Cura. In the GUI version of Cura, you can find the setting for removing supports under the “Expert” settings tab. Just scroll down until you see the “Support Z Distance” setting. By default, this is set to 0.2mm, but you can increase or decrease it depending on how much support material you want to remove. If you’re using the CLI version of Cura, the setting is called “–support-z-distance”.
You can set it to any value between 0 and 1.0mm. Once you have your settings configured, all you need to do is slice your model and export the G-code file. Then open up the G-code file in a text editor and search for the “M190” command. This command tells Cura when to start heating up the bed. Just below that command, insert a new line with the following: ;SUPPORT_REMOVAL start.
This will tell Cura where to start removing supports from your model. Save the file and then upload it to your printer!
How to Remove Supports from 3D Prints Abs?
If you’re like me, you love 3D printing. But one of the most frustrating things about 3D printing is removing supports. They’re always in the way, and they never seem to come out easily. Well, I’m here to tell you that there’s a better way! With just a few simple steps, you can remove supports from your 3D prints with ease. Let’s get started! The first thing you’ll need to do is heat up your print bed. I like to use a hair dryer for this, but you can also use an oven or heat gun. Just make sure the surface is nice and warm before we start.
Next, take a sharp knife and carefully insert it under the support material. You want to be careful not to damage your print, so go slowly and be gentle. Once the blade is inserted, twist it back and forth until the support material pops off. If it’s being stubborn, you can try heating up the area again with your hair dryer or heat gun. And that’s it! Just repeat these steps for each support until they’re all removed. Now you can enjoy your beautiful 3D print without those pesky supports getting in the way!
How to Remove Thick Supports from 3D Prints?
3D printing is a fantastic technology that allows you to create complex objects from a digital file. However, one of the challenges of 3D printing is removing supports from your prints. Supports are necessary to print certain features, but they can be difficult to remove and can leave behind unsightly marks. There are a few different ways to remove supports from your 3D prints. The most common method is to use pliers or tweezers to break off the supports at their base. This can be time-consuming and frustrating, especially if the supports are large or numerous.
Another option is to use a support removal tool, such as the ones made by Zortrax or Ultimaker. These tools attach to your printer and automatically remove supports as the print progresses. This is a much faster and easier method, but it does require special hardware.
Finally, you can also use chemicals to dissolve away supports. This method is typically used for delicate prints where manual removal could damage the model. Chemical support removal is also very fast, but it requires careful handling and ventilation due to the fumes produced during dissolution. No matter which method you choose, removing supports from your 3D prints doesn’t have to be difficult!
How to Remove Supports from 3D Prints Resin?
If you’re like me, you’ve probably spent hours painstakingly creating a 3D print only to find that supports are required to keep it from collapsing in on itself. Here’s a quick and easy guide on how to remove those pesky supports without damaging your print! Supports are generally made of the same material as your 3D print, so they can be removed with the same tools. I like to use a combination of needle-nose pliers and tweezers for this task.
First, gently wiggle the support free from the body of your print. If it’s really stuck, you can carefully apply some heat (I use a hair dryer) to loosen things up. Once the support is free, use your tweezers or pliers to gently pull it away from the surface of your 3D print. Be careful not to damage the delicate details of your model! And that’s it – removing supports from 3D prints is quick and easy once you know how!
How to Remove Supports from 3D Prints Prusa?
If you’re looking to remove supports from your 3D prints, the Prusa i3 MK2 is a great option. With its built-in support material removal system, it’s easy to get clean and crisp results. Here’s a step-by-step guide on how to do it:
- Start by heating up your Prusa i3 MK2 to the recommended temperature for your filament. For PLA, this is usually around 200 degrees Celsius.
- Once the printer is heated up, load in your print file and begin printing as normal. When the print is finished, carefully remove the build plate and let the print cool down for a few minutes before proceeding.
- Using a pair of needle nose pliers or tweezers, gently grasp each support strand and pull it away from the print surface. Try to avoid touching the actual printed part with the tips of the pliers so as not to damage it.
3D Printing Breaking off Supports
3D printing is a process of making three-dimensional solid objects from a digital file. The creation of a 3D printed object is achieved using additive processes, where an object is created by successively adding material layer by layer.
One of the benefits of 3D printing is the ability to print objects with complex geometries or features that would be otherwise difficult or impossible to create using traditional manufacturing methods.
However, this complexity can also present challenges during the printing process, such as when supports are required to prop up parts of an object during printing.
If not properly removed, supports can cause breakage or other damage to a 3D printed object. In this blog post, we’ll take a look at some tips for removing supports from your 3D printed objects without damaging them in the process.
Conclusion
3D printing is a process of making three dimensional solid objects from a digital file. The creation of a 3D printed object is achieved using additive processes. In an additive process an object is created by successively adding material until the entire object is created. Each layer can be seen as a thinly sliced horizontal cross-section of the eventual object.
To remove supports from your 3D print, start by gently breaking them away with your hands. If they are stubborn, use needle nose pliers or tweezers to get a better grip and twist them off. Once all the big pieces are removed, go over the model with a sharp knife or hobby knife to remove any remaining bits of support material.

Senior Editor at Techdoa.com. With a great experience after using multiple printers, I review best printers with proper guideline. I hope my provided information will inspire you to choose the best printer for your personal or professional work.